Roasted Lemon-Dill Salmon (pes, gf) and Really Easy Butternut Squash Soup (v, gf)

You know those meals that look impressive but are super easy to throw together? The hands-off, Williams Sonoma photo shoot, break out your all-white everything serveware at your winter home in the Swiss Alps fancy? Yeah. Those are my favorite. Here’s one to add to your arsenal.

ROASTED SALMON WITH LEMON AND DILL

Ingredients:

  • 1-2 lb salmon plank
  • 1 lemon
  • 10-15 fresh dill sprigs
  • olive oil
  • kosher salt & cracked black pepper
  • parchment paper

Directions:

On a baking dish, place the salmon on a sheet of parchment paper. The paper isn’t a must but will simplify cleanup. Generously salt and pepper the salmon. Cut the lemon in half and juice one half. Slice the other lemon half into thin, crosswise slices.

FullSizeRender (7)

Read More


Seafood Chowda (pes, gf)

Making this soup really stepped up my annoying culinary joke game last week. Anytime I make/eat/order/think of chowder, I think of the Simpsons chowda/chower Freddy Quimby scandal episode, which makes me laugh out loud regardless of time or location:

And having been given a beautiful filet of Alaskan halibut that I used in the chowder, I also got to walk around saying things like this,

halibut

which, as you can imagine, made me very happy. Just for the halibut…. hahahahaha…. Oh, top hat crab! You so crazy.

On to the soup. I’d stumbled across the idea for salmon chowder, which sounded delicious but quickly changed when the halibut entered my life. I decided to make a halibut, cod, and shrimp chowder just for the- wait for it- because I wanted to. Gotcha.

soup8

This soup can be made with whatever sturdy fish fillets you have on hand. You want the fish to be thick enough to stand up to being cooked in hot broth- the goal is to have large, spoon-sized chunks of cooked fish in the soup, not flakes. Leave the fish out altogether if you prefer- shrimp, chunks of lobster, and scallops would be equally amazing. This was a really tasty dinner and improved, as most soups do, overnight. It keeps for a few days and travels well. All in all, a tasty, hearty, warming dish.

SEAFOOD CHOWDA

Ingredients:

  • 2 lbs fish, skinned and boned, cut into 1″ chunks, or 2 lbs seafood and shellfish mix of your choice
  • large handful peeled and deveined shrimp, optional
  • 2 tbsp butter or olive oil
  • 1 1/2 tbsp flour, optional (leave out for gf option)
  • 1/2-1 tsp dried tarragon
  • 1/2 tsp fennel seeds
  • kosher salt, to tastesoup1
  • 1/2 tsp cracked black pepper
  • 3 leeks, white and light green bits chopped into rings 
  • 3 stalks celery, chopped
  • 1 1/2 lbs fingerling potatoes, scrubbed and cut into rounds
  • 1 clove minced garlic, optional
  • 1 bulb fennel, stalks and fronds cut off, chopped into small pieces
  • large handful kale, chopped
  • 1/2 cup frozen corn, thawed
  • 6 cups stock or broth of your choice
  • 1 cup half-and half
  • 1/4 cup chopped fresh chives, optional
  • Crystal hot sauce, for serving – or (sacrilegious) Tabasco

Read More


Quickie: Shiitakes & Soba (v, gf)

Mushrooms! So tasty, so good for you. Shiitakes, specifically, are a well-known source of iron and immune-boosting properties (hear ye, hear ye, vegans and vegetarians: rich veggie iron source). The ever-popular goop recently published a piece on the health benefits of mushrooms (more on that here) and ideas on how to work them into your diet; here’s my very quick, single serving, weeknight-friendly take on their “Stir Fried Noodles with Mushrooms.” Enjoy!

mushrooms 4

SHIITAKES & SOBA

Adapted from goop

Ingredients:

  • 1 bundle soba noodles or 1 cup cooked soba (note: soba noodles must contain ONLY buckwheat flour to be considered gluten-free) mushrooms 5
  • 1 1/2 tbsp coconut oil
  • 1/4 lb fresh shiitake mushrooms, wiped clean with a damp paper towel and sliced; Whole Foods sells an especially tasty 1/4 lb package
  • 2-3 cloves garlic, finely minced
  • 1-inch chunk fresh ginger, peeled and finely minced
  • 2-3 green onions, sliced
  • 1 tbsp soy sauce
  • drizzle sesame oil
  • sesame seeds

Directions:

Cook your soba noodles according to package directions, drain, and set aside. Chop your aromatics while the noodles cook (love the word aromatics). Meanwhile, heat the coconut oil in a non-stick skillet over medium-high heat. Add the sliced mushrooms and cook until browned, stirring to ensure they don’t stick, about 5 minutes.

mushrooms 2

Add the ginger and garlic and cook another minute, stirring. Add the cooked noodles, green onions, soy sauce, and sesame oil, tossing to coat and heat everything through. Remove to a bowl, sprinkle with sesame seeds, and enjoy! Really tasty 10-minute dinner! The best kind!

mushrooms 3


Party Food! Cashews with Shallots and Lime (v, gf)

Book club snack time! My book club met last night, so I thought I’d try out a new snack recipe ahead of the holidays. If it worked, great, and if it was bad, we’d have wine to distract us. Win-win!

cashews

They were nutty, salty, tangy, savory from the fried shallots, and addictive. Great party food. I apologize for the lack of photos; this was a hands-on recipe [involving hot oil, yikes] and I only have the before and after to share with you. That being said, here’s how to make it!

CASHEWS WITH SHALLOTS & LIME

Adapted from Food & Wine 

Ingredients:

FullSizeRender

original plan included sesame seeds…

  • 1 1/4 lb raw cashews
  • 3 limes, zested and juiced
  • 2 large shallots, sliced thin
  • 1/2 c vegetable oil
  • kosher salt


Directions:

Place the cashews in a large, wide bowl. Finely zest the three limes, setting the zest aside. Juice the limes and pour the lime juice over the cashews, marinating for one hour.

As these soak, slice each shallot in half lengthwise and finely chop the halved into thin half-moon-shaped slices. In a deep saucepan, heat the vegetable oil over medium heat; it will be ready when a shallot dropped in sizzles and immediately starts to cook. Add the shallots to the hot oil and cook, stirring often for about 2 minutes until they’re golden brown. Remove with a slotted spoon to a paper towel-lined plate and leave the heat on.

When the cashews are done soaking, drain and pat them dry. Add them in two batches to the hot oil, cooking and stirring until brown, about 5 minutes per batch. Remove with the same spoon to a paper towel-lined baking sheet to cool and sprinkle with salt, to taste (go heavy, they’re raw so they need lots of flavor). Pour the cooled cashews into a large bowl and mix in the lime zest; top with the fried shallots. All done! Go party!


Brown & Wild Rice with Caremelized Onions, Creminis, and Greens (gf, v)

What a whirlwind this winter has been! Geez! Work, school, weddings, visits with family and friends, freezing cold weather, sweaty hot weather vacation, back to work and school. And somehow it is March! And 60 degrees in Missouri, which is very, very welcome and much appreciated… but I still can’t figure out where February and January went. Do you know? They must have blown by me in a wintry blur.

rice 10

50 shades of plane

Throughout the Jan-Feb blur I sustained myself on sad  things like Foods Sold By Panera Bread, cereal, canned beans and frozen brown rice, kimchi and pickles delivered fork-to-mouth from the jar, and frozen Ghirardelli chocolate. YUM. My poor husband was left to fend for himself (shout out to the Whole Foods hot bar). I managed to cook a couple of times in February; here’s a recipe I chose for a day when my body was screaming at me for much-needed veggies and grains already, woman! Put down the chocolate!

rice 8

BROWN  WILD RICE WITH CAREMELIZED ONIONS, CREMINIS, AND GREENS 

Ingredients:FullSizeRender (1)

  • 1 cup uncooked brown rice
  • 1/3 cup uncooked wild rice
  • 2 2/3 cup water or stock
  • 1 tsp veggie base or bullion if using water
  • 1 tbsp butter (omit for vegan recipe)rice 1
  • 1 tbsp olive oil
  • 1 large yellow onion, sliced thinly into rings or half moons
  • 1 carton cremini mushrooms, cleaned and sliced
  •  a few sprigs thyme or 1/2 tsp dried
  • 3+ garlic cloves, chopped
  • half bag spinach leaves
  • a few handsful broccoli, chopped
  • 1 tablespoon water
  • kosher salt and freshly ground black pepper

Read More


Butternut Squash and Kale Mash with Toasted Walnuts and Sage (gf, veg, v option)

Greetings, hungry blogosphere! Today’s post is sinfully tasty vegetarian feast and a retooled version of a recently republished Ree Drummond recipe. That Ree Drummond? The accidental country girl-slash-Pioneer Woman? Yep, that one, I luh her. I’ve subscribed to her blog for years (haven’t seen the show so I’m absolved if it’s terrible). She’s a very funny writer who cooks like a real person who feeds other real people in real situations and really loves real food. No “poached quail eggs in nests of freeze-dried seaweed” from The Pioneer Woman. Phew! “Thanks, Ree!” cried happy stomachs everywhere.

another reason I like Ree: she occasionally  punctuates her posts with cheeky pictures like this one

another reason I like Ree: she occasionally punctuates her posts with cheeky pictures like this one

The Pioneer Woman’s butternut squash and kale recipe is no exception to her practical/delicious formula. It’s simple, fast, healthy, hearty, and can be used in roughly one bajillion ways. Get a load ofof Ree’s fabulous suggestions for using the mixture: in quesadillas! stirred into risotto! in a grilled cheese sandwich! in a pita with chicken! puréed with broth to make soup! tossed with bowtie pasta, olive oil, and Parmesan! as an appetizer, on crackers with goat cheese! alone, on a plate!

kale 10

Basically, regardless of which of the bajillion ways you serve this dish, it will be delicious, so make a big pot. I added onion, sage, and walnuts to my version and we enjoyed it with turkey cutlets Dave made. He was the Marlboro Man to my Pioneer Woman as we cooked. Ree Drummond joke. NBD.

kale dinner

BUTTERNUT SQUASH AND KALE MASH WITH TOASTED WALNUTS AND SAGE

Inspired by The Pioneer Woman

Ingredients:kale 1

  • 1 12-oz bag chopped kale, or 1 head kale, roughly chopped with stalks removed
  • 1 bag cubed butternut squash or 1 butternut squash, cubed and peeled with seeds removed
  • 1 small yellow onion, diced
  • 2 tbsp butter
  • 2 tbsp olive oil
  • 2-3 tbsp water
  • 1/2 tsp kosher salt
  • 1/2 tsp ground sage
  • 1/4 tsp chili powder
  • a few grates of fresh nutmeg
  • cracked black pepper, to taste
  • 1/3 cup raw walnuts

Directions:

In a deep saucepan or cast iron skillet, heat the butter and olive oil over medium. When the butter has melted and is slightly foamy, add the onion and sauté until translucent. I love this smell.

kale 2

Add the butternut squash, salt, sage, nutmeg, and chili powder and saute about 5 minutes, until all sides have had a some time with the direct heat. Reduce heat to medium-low and cover with a lid, steaming for 5 more minutes until the squash is soft. The steaming makes this dish a mash; if you’re looking for a more caramelized consistency, be patient and sauté until golden brown.

While the squash steams, toast the walnuts in a small nonstick skillet over medium, tossing so they don’t burn. They’re done when they’re a fragrant, toasty brown. Remove from heat and set aside.

kale 4

When the butternut squash is soft, remove the mixture to a large bowl and return the pan to the stove, turning the heat back up to medium high. Add 2 tablespoons water and bring to a simmer. Add the torn kale leaves and stir around for a few minutes, letting them wilt. If they get dry, add another tablespoon water.

When the leaves have wilted and broken down (break them! break their spirit!), stir them into the squash, tasting for seasoning and grinding in as much pepper as you’d like. Top with the toasted walnuts and serve!


Creamy Crockpot Pinto Beans (gf, v option) and Gluten-free Cornbread (gf, veg)

The Missouri November weather was spectacular last weekend. Dave and I went on an epic, 3-hour, 10+ mile hike around the Weldon Spring area to enjoy said Missouri November weather, beginning and ending at the Weldon Spring Disposal Cell. What is the Weldon Spring Disposal Cell, you ask? Well, we wondered the same thing. It’s a 45-acre mound of rocks covering layers of nuclear waste. And you can walk to the top! How’s that for a bizarre tourist attraction?

beans 15

view from the top

The Us Army Ordinance Works purchased the site and adjacent land (17,232 acres- whoa) in 1941. The Army contracted the Atlas Powder Company to manufacture trinitrotoluene (TNT) and dinitrotoluene (DNT) at a sprawling factory complex on the site until 1945 to support World War II efforts. After the war, the Army started selling off the land but kept about 2,000 acres to house the Weldon Spring Uranium Feed Mill Plant, which was just what it sounds like- a uranium ore processing plant that operated from 1955 to 1966. Uranium ore processing plants produce well, radioactive waste, and that, kids, is what’s tucked beneath the Weldon Spring Disposal Cell.

beans 14

beans 17

I’m hesitant to believe that the waste isn’t harmful to the surrounding communities or people walking all over the cell, but so far, I feel no strange after-effects. I can see better, though. Strange…. Anyway, we were starving when we got home and had breakfast-for-lunch, with the addition of these warming, slow-cooked, creamy pinto beans and leftover cornbread to dunk in them. I’d soaked the beans overnight the night before and put them in the crockpot before we headed out, so only finishing touches were left to be made when we got back. The cornbread originally accompanied some white bean chicken chili we’d made and heated up well to go with the beans. So, without further ado, creamy crockpot pinto beans and gluten-free cornbread!

beans 12

CREAMY CROCKPOT PINTO BEANS

Ingredients:

  • 1 bag dry pinto beans, rinsed and sorted
  • water
  • 1 tsp kosher salt
  • freshly ground black pepper
  • 2 slices bacon, chopped, or 2 tbsp olive oil for vegan beans
  • 1 yellow or white onion, diced
  • 4-5 cloves garlic, chopped

Directions:

Rinse the dry beans after you pick them over for any rocks or clumps of dirt. Finding rocks and clumps of dirt in bags of dry beans isn’t as far-fetched as it sounds, but it is every bit as gross as it sounds, so look ’em over good. Put the beans in a bowl and cover with an inch of water, soaking at least 8 hours or overnight. How retro-frugal you are, soaking beans! Good for you. The WWII-era Real Housewives of Weldon Spring would be proud.

beans 1

RHOWS

When the beans have had a good soaking, dump their soaking water, rinse them again, and put them in your crockpot. Cover with water, up to 1/2 inch above the beans. Keep in mind that when cooking in a crockpot, the water added to a recipe will stay put, so add as much as you’d like or not like. Cover and set to low for 8 hours or high for 4. Take a hike.

When you return from your hike/nap/workday/classified mission, chop the 2 pieces of bacon and cook them over medium in a small skillet until crispy. If you’re omitting bacon, heat the olive oil over medium. Remove the bacon once it’s crispy and add the onion to the bacon fat or olive oil, cooking for 3-4 minutes until translucent. Add the garlic and cook another minute.

Salt and pepper the onions, and add the onions, bacon, and 2 cups of beans to a food processor. Whir that sucker until the mixture is smooth and creamy, then stir the mixture back into the pot of beans.

You’re all done! The beans are even better the next day. They’re rich and creamy and make a perfect partner for a few hunks of….

OLD FASHIONED GLUTEN-FREE CORNBREAD

Adapted from Gluten Free On a Shoestring

Ingredients:

  • 2 cups yellow cornmealbread 1
  • 1 tsp baking soda
  • 2 tsp baking powder
  • 1 tsp kosher salt
  • 1 room-temperature egg, beaten
  • 4 tbsp melted butter, cooled
  • 1 1/2 cups room-temperature plain yogurt
  • 4 tbsp raw honey

Directions:

Grab two bowls and preheat your oven to 400. In the larger bowl, whisk together the dry ingredients: cornmeal, baking soda, baking powder, and salt.

bread 2

In a second, smaller bowl, whisk together the wet ingredients: egg, butter, yogurt, and honey.

bread 3

Now make a well in the middle of the dry ingredients in the large bowl. See where this is going? Now you know why the dry ingredients got more bowl-love than the wet ones. Pour the wet ingredients into the center well and mix until just combined.

bread 4

Grease a cast-iron skillet or 9×13″ pan and spread the cornmeal mixture in evenly. Bake for 20 minutes, until the top is golden-brown.

bread 6

This celiac husband-friendly side was quite tasty. It held together well but was also crumbly, and would be great with the addition of cheddar cheese or chopped green chiles. It was great with the white chili and stood up to the beans.  What will you serve with yours?


“Golumpki,” or Cabbage Rolls (gf, v option)

Friends! It has been too long! I passed the exam I was studying for and slumped into an exhausted, thumb-sucking ball for a month post-test. Lots of celebration, lots of yoga, and one trip to San Fran to see great friends later- I’m back! Back and cooking again. It’s fall in Saint Louis and the change-of-season cooking bug has bitten me again. My favorite bite. I’m so happy to be back in a bit of a routine and I’ll tell you- being back to writing and sharing on a!g feels fantastic. Let’s get cooking.

cabbage1

Sometime in the whirlwind that was the first 3 quarters of 2014, my husband was diagnosed with a severe gluten intolerance (possibly celiac disease… this caused major malnutrition- what the heck! poor guy just wanted some sandwiches!). Most of what I cooked on a daily basis before the diagnosis was gluten free, save for a cake or bread project here or there, but this news has majorly changed what’s coming into and being prepared in our kitchen.

cabbage11

Considering his dietary needs and my hankering as of late for cooked cabbage (all my life, I’ve been waiting to become that small, ethnic grandmother I know I’m supposed to be), I freestyled a pot of the humble golumpki, or, cabbage roll for dinner last night. My version has beef but it can easily be omitted to make a vegan version; you also have a stovetop or crockpot choice to make.

GOLUMPKI (CABBAGE ROLLS)

Ingredients:

  • I large head cabbage, core removed
  • 1/2 lb portobello mushroom caps (increase to 1lb for vegan rolls), chopped fine
  • 1 lb high-quality lean ground beef
  • 1 yellow onion, diced
  • 1 parsnip, shredded
  • 1 large carrot or 1 cup baby carrots, shredded
  • 2 stalks celery, chopped
  • 3 cloves garlic, chopped
  • 1 cup brown rice, uncooked
  • 1-2 sprigs fresh thyme
  • 2 tbsp olive oil
  • kosher salt and black pepper, to taste
  • 2 tbsp tomato paste
  • tomato sauce or juice, to taste (2-14.5 oz cans tomato sauce/1 -28 oz can crushed tomatoes OR 1-14.5 oz can tomato sauce and large can tomato juice, see super-serious Note On Tomato Sauce below)

Directions:

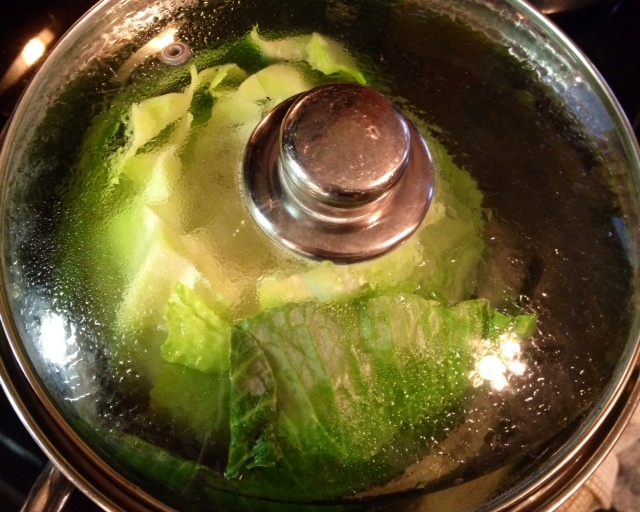
This is a homey meal that comes with a homey preparation: it’s simmered on the stove for 2 hours or can be made in a slow cooker. So, not a top pick for nights when you need a quick meal, but a great pick for easy, warm nights with a glass of red wine to help you cook and some jazz on the radio. Now that you know this and have cleared your calendar, boil a large pot of water and core the cabbage with a large knife. When the water is boiling, remove the pot to a trivet, place the cabbage in the hot water core side-up, and cover. Let this sit for 10-15 minutes while you prep your veggies.

cabbage2

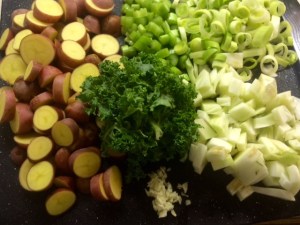
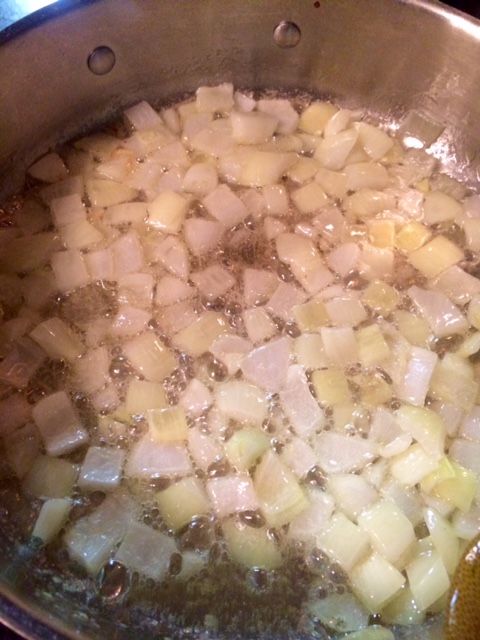
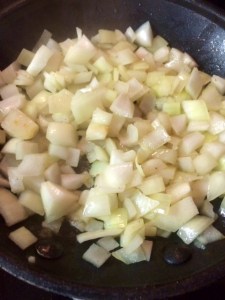
Heat the oil over medium in a deep, heavy-bottomed pot. Make sure it has a lid if you’re not going the slow-cooker route. Veggie prep!! Save yourself some time and shred the carrot and parsnip in a food processor. This is also how I chopped the portobellos. Just pulse, pulse, pulse until you have a small chop. I diced my onion because I love dicing onions, but the onion could absolutely go the food processor route. Mince the garlic and set aside. Add the onion to the oil and sauté, stirring occasionally. Put the thyme, parsnip, carrot, celery, and mushrooms in a large bowl as the onion cooks (keep the garlic set aside).
cabbage4

When the onion is translucent, add the bowl o’ veg. Stir it all up and salt and pepper the mix generously. This mixture will release quite a bit of liquid, so allow the liquid to cook off. It helps to create a well in the middle as the veggies cook- the liquid will gather there and simmer away.

cabbage5

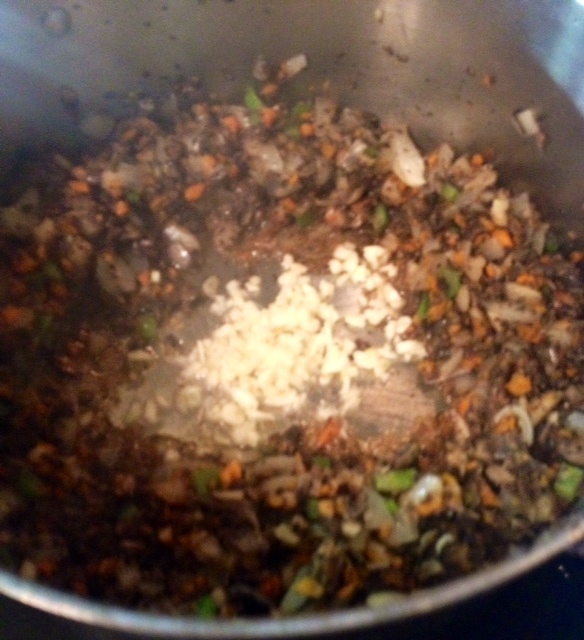
When the liquid is almost all the way gone, splash a bit more olive oil in the well you’ve created and add your garlic, stirring until fragrant.

cabbage6

Remove from heat and stir well. Pour back into the large bowl and let cool for a few minutes… and let’s get back to the cabbage. The cabbage will be soft and pliable now. With tongs, peel off about 15 leaves, one by one.

cabbage3

I cut out the large, tough vein in the leaves, but you don’t have to. Set the leaves aside and mix the ground beef, rice, and tomato paste in with the veggie mixture. Salt and pepper again, and mix a second time. This is your filling! You’re almost ready to leave the kitchen!

cabbage7

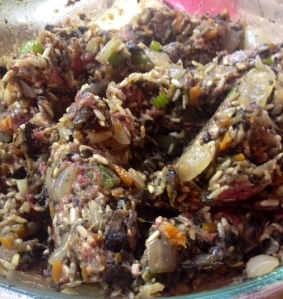
this looks kind of gross, eh?

Grab the pot you cooked the veggies in OR your crockpot, whichever you’ll be using. Take a cabbage leaf and scoop 1/4-1/3 cup of the filling into the leaf depending on the leaf’s size, rolling the bottom, then sides, and then top down around it. I didn’t photograph this process, but here’s a helpful 20 second video made by someone who did. It’s very easy. Arrange the little bundles snugly in the pot or crockpot. You’ll have 2-3 layers of bundles, depending on the size of your pot.

cabbage8

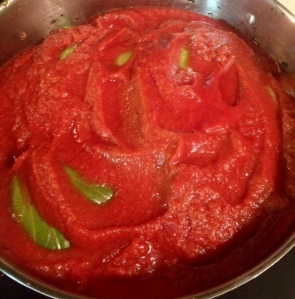
Now for my Note On Tomato Sauce: allow my trial and error to guide you, grasshopper. I throw myself on the cooking pyre for YOU, for youuuu. Okay, so I poured two cans of tomato sauce and a large can of crushed tomatoes over my cabbage rolls. The combo was too thick and too seasoned, and overpowered the more delicate flavors of the rolls. If you’re a big tomato fan, by all means- go this route. Otherwise, I strongly suggest using one can of tomato sauce (or 2 cups of your favorite jarred or homemade sauce) and pouring in tomato juice or V8 until the mixture reaches the top of the rolls. Up to you. Comme ci, comme ça.

cabbage9

bye bye, golumps

If you’re using a crockpot, cover and set to low for 8 hours. You could refrigerate the crock at this point and start it in the morning, if you’d like. If you’re cooking on a stove top, bring the tomato mixture to a boil and then cover, reduce the heat to medium-low, and simmer for 2 hours. What will you do in those 2 hours? I read about *nothing* in Allure and we watched some DVR’ed triathlon, because we are that cool.  So! Kick up your heels…

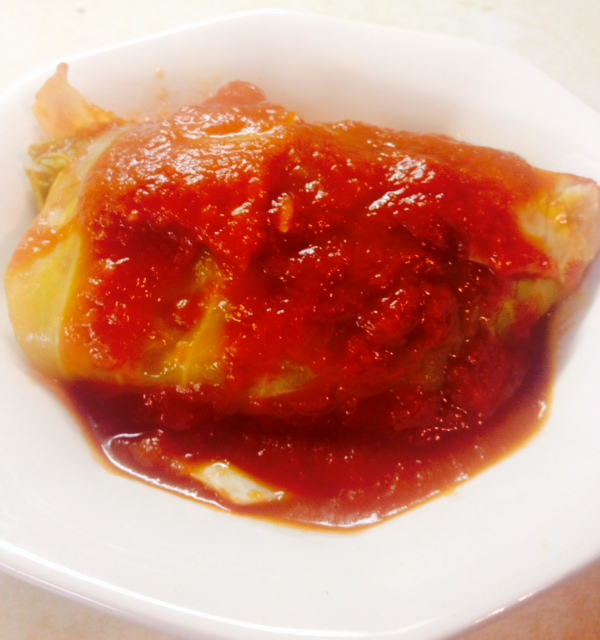
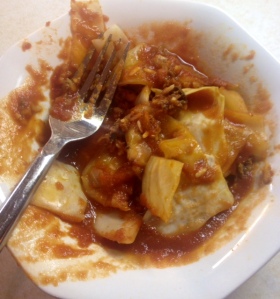
…and, as on a cooking show, I’m sorry, but your long cooking time has magically elapsed and it’s time to head back into the kitchen. Everything’s easy from here,  though: serve. With sour cream, if you’d like, or mashed potatoes on the side. There’s a picture of a pretty roll up top, but you will lay waste to your cabbage rolls and they will look like this:

cabbage12HAPPY GOLUMPING!