Brian’s Sunday Soup (v, gf)

The introduction to this glorious soup should start with an introduction to my uncle Brian and aunt Liz. They are runners, scientists, urban farmers, yogis, cat whisperers, and cooks. They’ve been known to move to China and Korea to teach English. They work tirelessly to restore the creek by their home* to health. They’ve collected water in rain barrels decades longer than your ironically bearded neighbor has, and they do things like compost and march for clean energy because everyone should do those things. On top of all this, they find time to fearlessly reinvent their careers and go see St. Vincent at the 9:30 Club. They’re that cool.

brians soup

So now you know a bit about the brilliantly kaleidoscopic lives that inhabit the sunny kitchen full of great conversation where my uncle Brian threw together this soup the last time we visited. The soup is as healthy and vibrant as Liz and he. “Oh, it’s just got a little of everything in it,” Brian humbly explained as Dave and I poured bowls of the stuff into our gaping faces. If we could have done keg stands over the stockpot, we would have. My sweet mama had come up that weekend to visit and she loved the soup- so did my 20-month-old curly-topped nephew! It’s a crowd-pleaser.

deftly showcasing his spoon-handling skills and Mardi Gras beads

the neph’ showcasing wicked awesome curls, spoon-handling skills, and Mardi Gras beads

I emailed Brian asking how to make the soup soon after and he gave me a true cook’s recipe- ingredients, ideas, tips, no measurements. The mark of a cook at home in his kitchen. I’ve included some of these notes. Behold, Brian’s Sunday Soup.

ingreds

BRIAN’S SUNDAY SOUP

Adapted from Brian Parr

Ingredients:

  • 1 bag of mixed beans, soaked overnight
  • eeoo (extra virgin olive oil)
  • 1 onion, diced
  • 3-4 garlic cloves, minced
  • Spice mix (edit according to your tastes): 1/2- 1 tsp coriander, 1/2-1 tsp curry powder, 1/2 tsp-1 tsp red pepper flakes, 1/2- 1 tsp turmericrosemary is nice if you have a bush, cumin (but only a little as you know how it overpowers everything else)
  • 1 sweet potato, diced
  • 1 russet potato, diced
  • sweet corn (sometimes)
  • 5-6 carrots, peeled and chopped into coins
  • 5-6 stalks celery, chopped, greens chopped and reserved
  • 1/3 cup brown lentils
  • 1/3 cup medium pearl barley (leave out if you’re avoiding gluten)
  • 2-3 quarts low sodium vegetable stock, or 2-3 quarts water and 1 1/2 tbsp low sodium vegetable base
  • 1 can of diced tomatoes, optional
  • freshly ground black pepper
  • a little bit of the vinegary juice form a jar of hot pepper rings adds a nice little bite!
  • red cabbage, sliced into confetti for garnish
  • mustard greens, sliced into confetti for garnish (super important and make all the difference. Plus, they are easy to grow and have a long season)
  • your favorite hot sauce for serving

Directions:

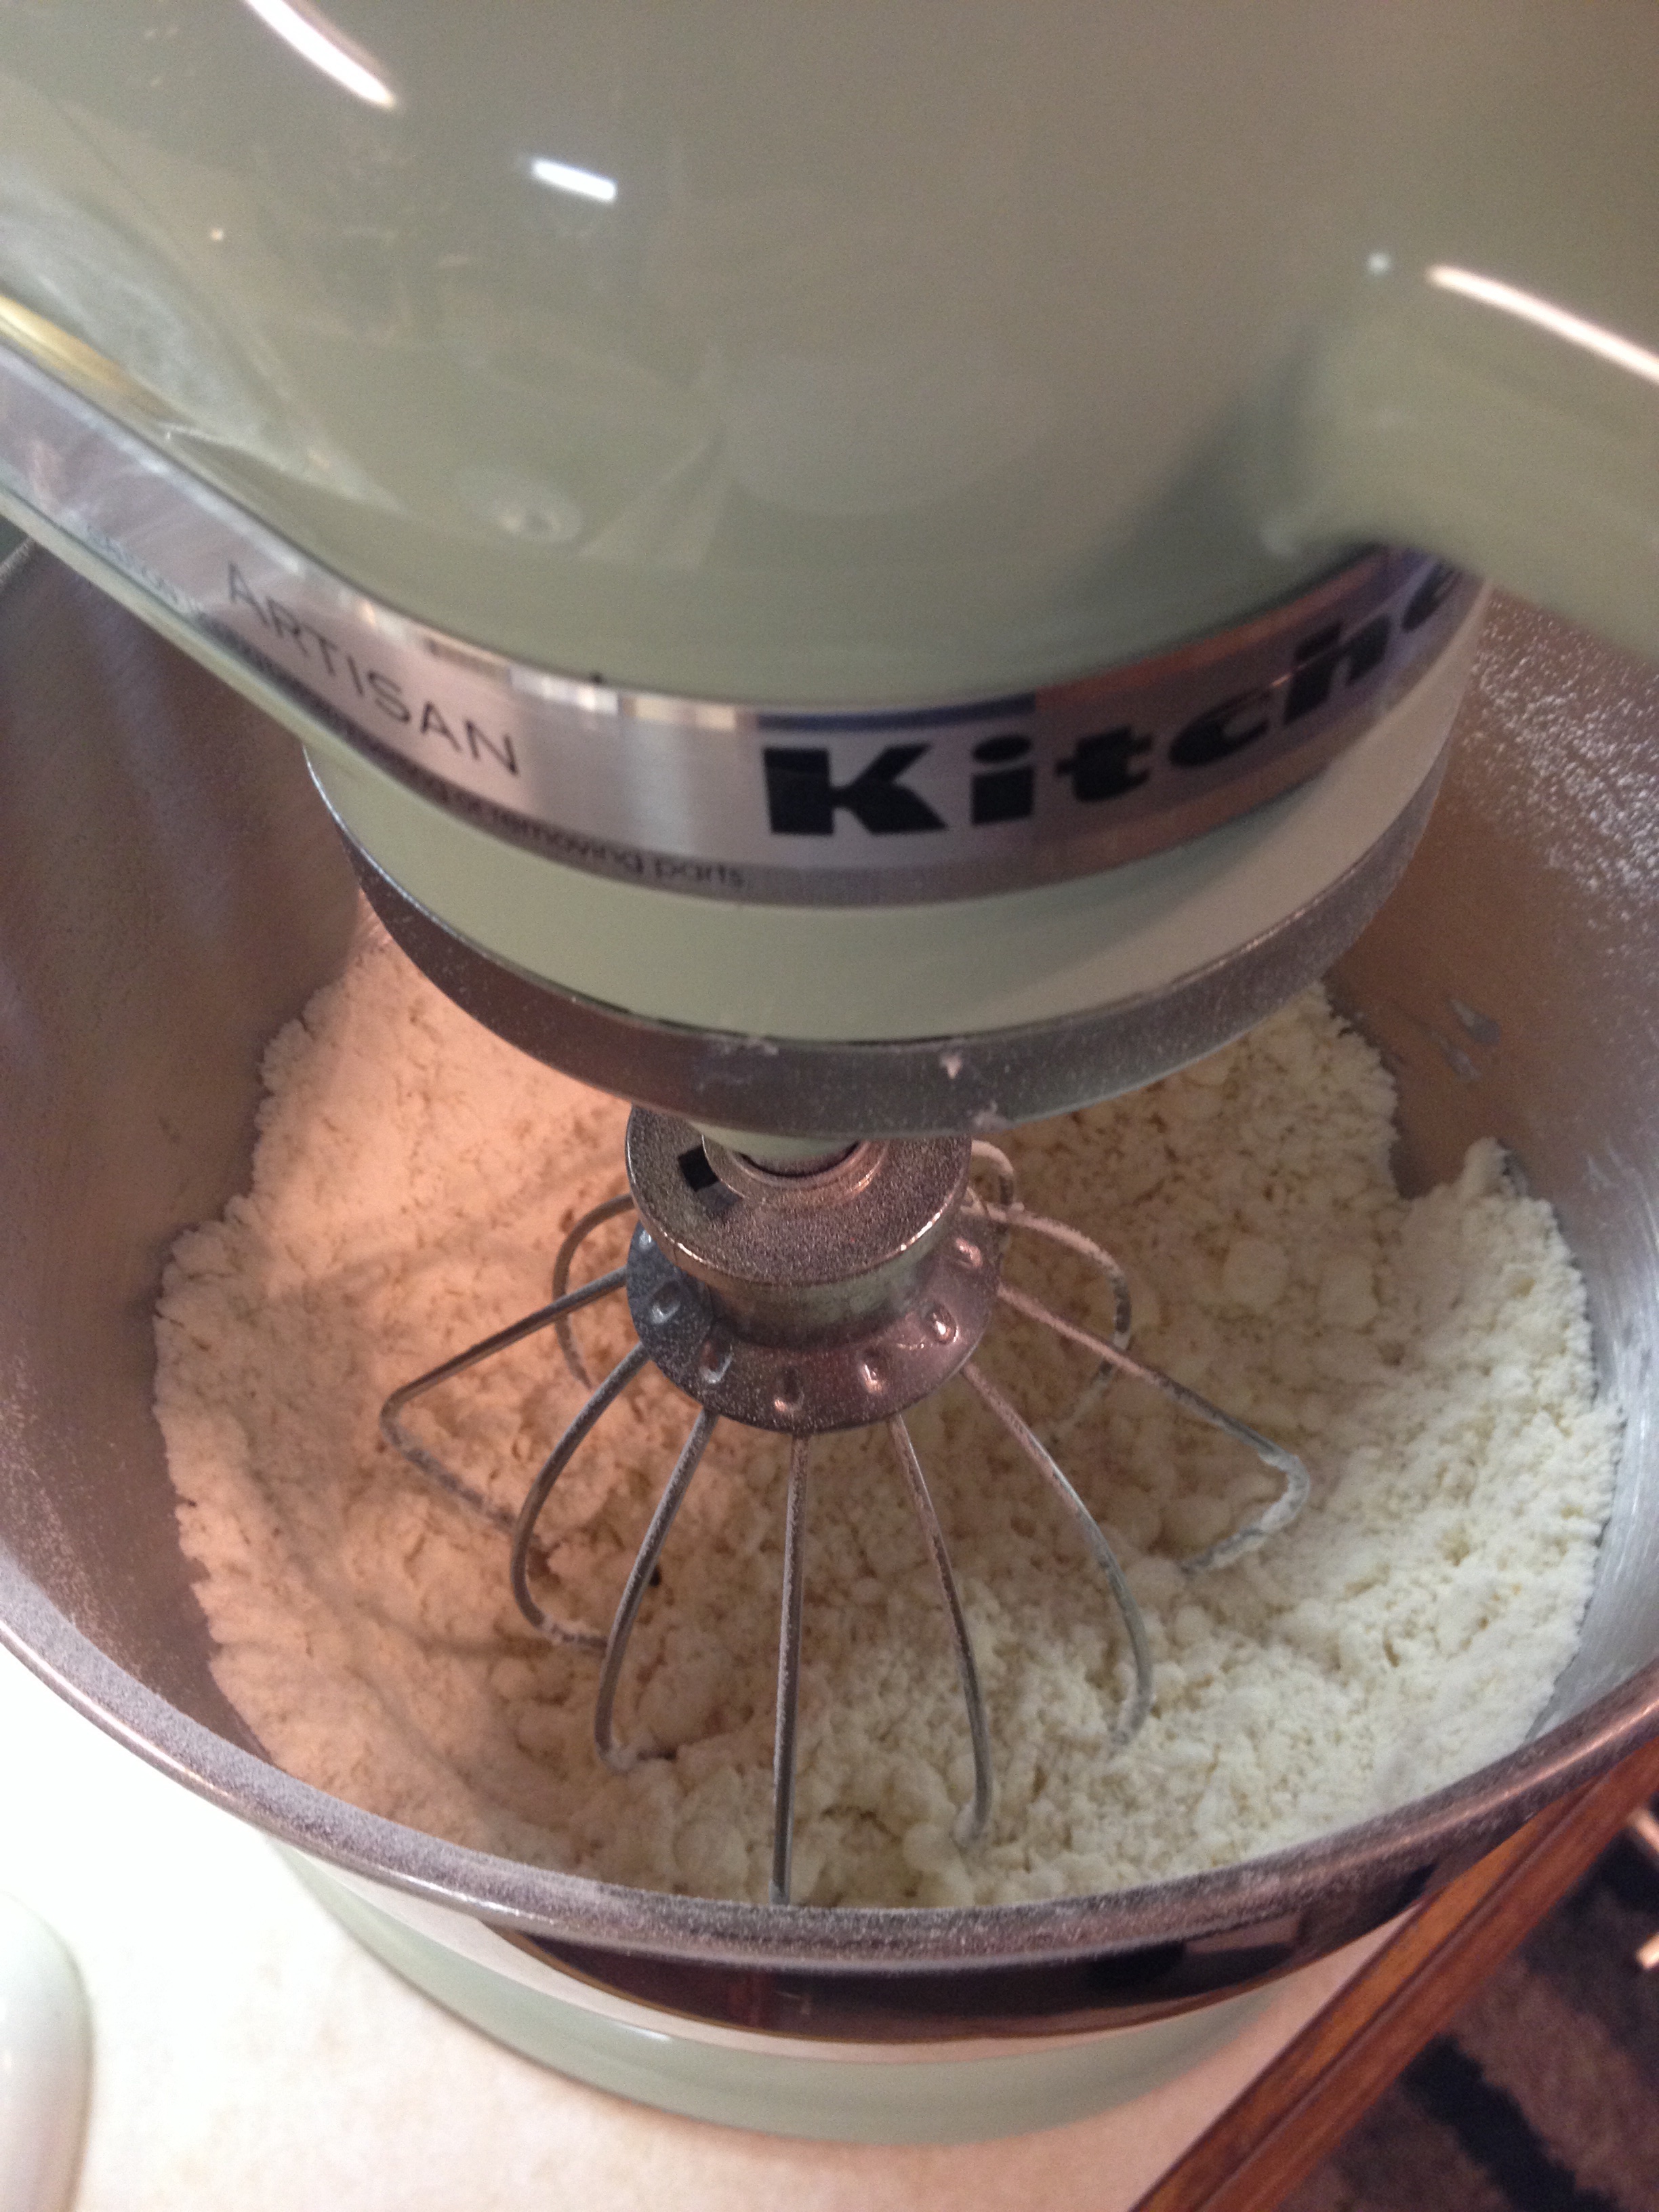
One day ahead, or before you leave for work: SOAK YOUR BEANS. Place them in a bowl or pot, cover with water to a depth of 2 inches above the beans, and let soak for 8 hours or overnight. I put my bowl of beans and water in the microwave to cat-proof while I was at work. Okay, now fast-forward, cooking show-style to: perfectly soaked beans! Rinse and drain them twice. Chop your veggies on your pretty wooden cutting board, which you should care for with food-grade mineral oil, did you know?

onions chopped final

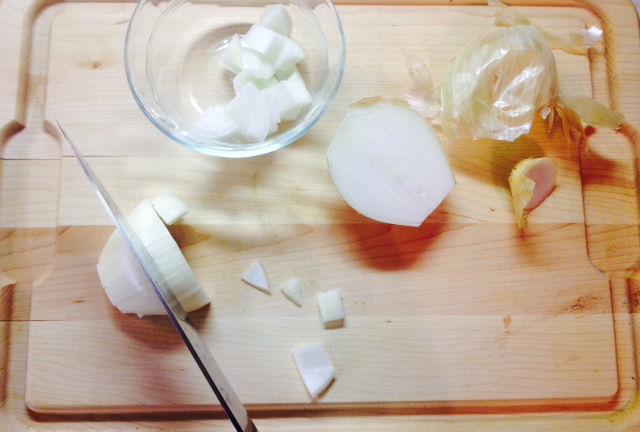
This soup is a very manly soup (if soups can be manly), as the recipe came from Brian and Dave made it at our house. Man Soup: for men, by men. In a large stockpot, have yo’ man heat 2 tablespoons olive oil over medium heat. Saute onion in eeoo in the pot, Get them to the browning stage on medium to low heat and then throw in the garlic at the end. Move the onion to the sides of the pot, create a space in the middle, and add spices to ‘dry cook.’ This gets really aromatic, sometimes to the point of burning eyes and coughing, achh, ohh, ahh, hack, hack….  As they cook on medium heat, be careful not to burn- they are quite potent!!

spices

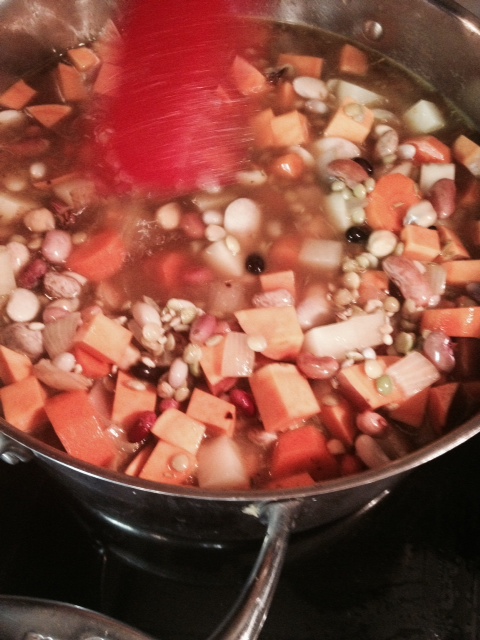
When your spice blend is fragrant and toasty, add the beans, russet potato, sweet potato, corn, carrots, lentils, tomatoes, and barley (you read that right- don’t add the celery!). Cover with enough water or stock to come a few inches above the veggies and beans and add vegetable base, if using. Stir the soup, raise the heat to medium-high and bring it to a boil. Reduce heat, cover, and simmer for 1 1/2- 2 hours on low, until the beans are tender.

soup

When the beans are tender, stir in the chopped celery. Give it a taste and add black pepper. Salt, if needed. Dip up a few bowls and top with the gorgeous, ribbony mix of red cabbage, celery greens, and mustard greens, the last of which give the soup a leafy, horseradish-like bite. You’ll be glad you did! Pass some hot sauce around. And go thank you uncle and aunt for being your uncle and aunt. It’s probably long overdue.

lovely greens and purples

lovely greens and purples

Thank you, Brian and Liz, for the hospitality and the memorable meal.

*


Heidi Swanson’s Broccoli Gribiche and My Coconut Kitchen Giveaway Winner! (veg, gf)

First things first: thank you to everyone who entered last week’s giveaway. I really enjoyed your responses- what healthy, creative people you are! To impartially choose a winner, I used the super-technical method of writing names on slips of paper and having a coworker choose one before lunch. All documented on high-quality iPhone video.

Rrrrrrroll ’em!

Congratulations Diana, winner of the My Coconut Kitchen coconut butter sampler pack! I hope you enjoy the sumptuous spreads as much as I do- let us all know how you use them.  Thank you to My Coconut Kitchen for the prize- be sure to check out Angie’s delicious inventory!

congrats

This week, I was looking for a meatless recipe with simple, clean flavors  that would fill me up, create leftovers, and be relatively simple to prepare. I was short on time and motivation and long on hunger, so who did I turn to? Heidi Swanson, author of Super Natural Every Day, a wonderful cookbook given to me by a wonderful aunt. My last Heidi Swanson post brought us another delicious meatless dinner- white beans with cabbage. Heidi’s broccoli gribiche recipe is listed in Super Natural Every Day under “lunch” and would be a showstopper at a picnic or potluck. I know it was a big hit at my one-woman potluck. Here it is! Broccoli gribiche.

gribiche done

BROCCOLI GRIBICHE

Adapted from Heidi Swanson

Ingredients:

  • 1 1/2 lbs fingerling potatoes
  • 1 large head broccoli, florets chopped into bite-sized pieces and some stem chopped
  • 2 tbsp + 1/4 cup olive oil (healthy fat!)
  • kosher salt
  • 4 hardboiled eggs, 1 cooked yolk set aside
  • 1 tsp Dijon mustard
  • 2 tbsp red wine vinegar
  • 2 shallots, finely diced
  • 1 tbsp capers, chopped
  • 2 tbsp parsley, chopped
  • 1 tbsp fresh or 1 tsp dried tarragon
  • 1 tbsp fresh or 1 tsp dried chives

Directions:

Preheat your oven to 400 degrees and arrange two racks in the middle and top of the oven. Wash the potatoes and chop any potatoes larger than your thumb in half. Do not chop your thumb in half, only thumb-sized potatoes. Toss the potatoes and any thumb bits with one tablespoon of the olive oil and a large pinch of kosher salt in a large bowl; turn the potatoes out into a single layer on a baking sheet and roast on the middle oven rack for the first 15 of 30 minutes. Set the bowl aside.

While the potatoes cook, hard boil your eggs. You can find a foolproof allez! gourmet hard-boiling method here if you need it- super, super easy. While the eggs cook, wash and chop your broccoli and toss with another tablespoon of olive oil and another pinch of salt in the large bowl. Once the potatoes have cooked 15 minutes, stir the potatoes, turn the broccoli out onto a separate baking sheet and place the broccoli on the top rack of the oven, roasting the potatoes and broccoli another 15 minutes. You can set both baking sheets aside when the roasted veggies are done.

potatoes and broccoli

Back to the eggs: let your hardboiled eggs cool in ice water for speedy cooling and to prevent rings around the yolks. Peel one, remove its yolk, and mash that yolk in the trusty, large bowl you used for the potatoes and broccoli. I’m saving you dirty dishes here. My husband would be proud. Verrry sloooowly whisk the 1/4 cup olive oil into the mashed egg yolk, emulsifying the mixture. It will be a lovely, velvety, glossy yellow.

dressing emulsify

a!g action shot! bam! pow!

Whisk in the mustard and then the vinegar. Add the shallots, capers, and herbs, mixing the gribiche well. Chop the remaining 3 1/2 eggs and gently fold them into the mixture.

dressing shallots

Now for the fun part- combine the potatoes and broccoli in an an even larger bowl and add the dressing, gently tossing everything to coat. Serve. This stuff is seriously delicious, reheats very well, and can be served cold or at room temp. The flavors of the dressing were even better the next day, having had some time to mix and mingle overnight. Cheeky devils. I paired mine with Trader Joe’s new cruciferous crunch mix, braised in olive oil with a bit of red wine vinegar. Enjoy!

dinnah is served

dinnah is served

Harkening back to March of last year, here’s an allez! gourmet recipe for a classic Spanish potato salad, Ensaladilla Rusa.


Quickie: Kimchi Tofu Soup and the Benefits of Fermented Foods (v, gf)

So it’s springtime. Allegedly. Can’t verify that for you right now, I’m too busy scraping ice off of my windshield. Or at least I was this morning… Sheesh! This should be the time to make chilled soups and bright, minty salads dotted with neon green peas! Instead, I find myself craving warmth, spice, and honestly, detoxification, thanks to an overzealous Friday night with friends (who are totally worth celebrating- hello, ladies). So I suppose that will be my spring theme for this delectable Korean-inspired recipe: renewal!

kimchi soup

The spicy, fragrant, good for you star of this detoxifying soup, kimchi, is a Korean side dish made with fermented vegetables, mainly cabbage. While kimchi is near and dear to my heart, all fermented and cultured foods are powerful nutritional underdogs. I’ll quote Casey Seidenberg’s  Washington Post rundown of why we should all be eating fermented foods: Seidenberg, co-founder of D.C.-based nutrition education company Nourish Schools, says,

“Organic or lactic-acid fermented foods (such as dill pickles and sauerkraut) are rich in enzyme activity that aids in the breakdown of our food, helping us absorb the important nutrients we rely on to stay healthy. | Fermented foods have been shown to support the beneficial bacteria in our digestive tract. In our antiseptic world with chlorinated water, antibiotics in our meat, our milk and our own bodies, and antibacterial everything, we could use some beneficial bacteria in our bodies. | When our digestion is functioning properly and we are absorbing and assimilating all the nutrients we need, our immune system tends to be happy, and thus better equipped to wage war against disease and illness.” 

underdog

What a delicious way to get the good bugs in our systems- by EATING! If kimchi’s not your style you can nosh on sauerkraut, beer (easy, tiger, easy), stinky cheese, dill pickles, yogurt, miso, sourdough bread, and kombucha to make your tummy and immune system happy and healthy. Or if you like kimchi and have five minutes, you can make this soup. Happy winterspringtime, everyone!

KIMCHI TOFU SOUP (KIMCHI JJIGAE)

Adapted from Competitive Cyclist

Ingredients:

  • 2 cups of your favorite kimchi, packed and chopped (I used two packages of Trader Joe’s napa cabbage kimchi)
  • 1 package tofu, cut to medium dice
  • 1 1/2 tbsp white vinegar
  • 4 cups water
  • 2 tsp low-sodium vegetable cooking base or 2 tsp bouillon
  • 1 tbsp low-sodium tamari or soy sauce
  • 1 tsp sesame oil
  • 1 tbsp Korean chili paste or garlic chili paste, such as Huy Fong
  • 1 bunch scallions, sliced and divided
  • eggs, optional

Directions:

Chop your kimchi into bite-sized pieces. You may eat as much as you want as you chop. Watch your fingers.

kimchi chopped

Dice the tofu block. It’s really fun.

tofu chopped

Mix the kimchi and vinegar and add to a large stockpot. Add the water, cooking base, tamari or soy sauce, sesame oil, chili paste, and half the scallions. Stir this together, then gently stir in the tofu blocks and bring the soup to a boil. If you’d like, crack a few eggs into the boiling soup and cook until the whites are opaque. If not, serve and top bowls with remaining fresh scallions, passing sesame oil around. So very tasty and so, so good for you.

kimchi soup cooking


Kale and White Bean Korma (v, gf)

This vibrant, fragrant dish makes me happy. Its colors and flavors of make me think of lovely Nepal and of colorful Northern India, which I imagine to be one of the most lively places in the world. The tantalizing smell of onion, ginger, and garlic cooking in coconut oil will make your kitchen feel like this:

Photo: National Geographic

Holi festival! photo: National Geographic

Korma is derived from the Urdu word ḳormā, or “braise.” Even though there’s no meat in this dish, you braise the sweet potatoes by cooking them with curry powder, onion, and a bit of tomato sauce before simmering them in coconut milk with kale and white beans. You can serve this korma with rice if you like or serve as a side dish. I found that it really holds up on it’s own; I dolloped mine with some plain Greek yogurt for a hearty meal.  स्वादिष्ट (delicious)!

kormalicious

kormalicious

KALE AND WHITE BEAN KORMA

Adapted from Food 52

Ingredients:

  • 1 tbsp coconut oil
  • 2 sweet potatoes, peeled and cubed
  • 1 yellow onion, diced
  • 3-4 cloves garlic, minced
  • 1-2 tsp minced fresh ginger
  • 4 oz tomato sauce (half of a small can)
  • 1 can light coconut milk
  • 1 tbsp curry powder (see note below)
  • 2 large handfuls chopped kale
  • 1 can cannelini beans, rinsed and drained
  • 1 tsp salt

Directions:

In a large stockpot, heat coconut oil over medium. Add the onion and saute until it’s translucent, about 5 minutes. Add the garlic and ginger and saute another minute.

onion

Add the sweet potatoes, curry powder, and tomato sauce. NOTE: if you don’t like curry powder (and many people don’t), omit it for Pete’s sake. Add paprika or brown sugar and pepper or red curry paste, or nothing or anything you like in its place. But if you do like curry powder, add it now. Continue to cook the sweet potatoes over medium for about ten minutes, until they begin to soften a bit.

sweet potatoes

Add the coconut milk, kale, and white beans. Bring the korma to a boil, cover, reduce heat to medium-low, and simmer for 20 minutes.

look at that nutritious jumble!

look at that nutritious jumble!

That’s all! Uncover and serve, you wholesome and adventurous veggie-lover, you. Top with yogurt or diced cucumbers. Enjoy!

KORMA BOWL


Eggplant Lasagna with Ricotta and Parmesan (veg, gf)

I love eggplant parmesan. I love lasagna. I do not necessarily love heavy meals that can’t be scarfed without guilt and/or heartburn unless those meals involve pizza and/or cookies, which have their own special place in my life and in the universe. This lasagna is really a lovely meal to serve, is very cheap to make, and is easy to assemble. Fresh veggies, grain free, a blender sauce, creamy ricotta, earthy eggplant, light and rich all at once. Ahh.

eggplant lasagna

So satisfy your Italian cravings and up your veggie intake. I served it with mixed greens on the side and Parmesan for passing. How will you serve your eggplant lasagna?

EGGPLANT LASAGNA WITH RICOTTA AND PARMESAN

Adapted from Real Simple

Ingredients:

  • 2 eggplants, sliced lengthwise (see photo below)
  • 1/2 lb Roma tomatoes, seeded
  • 2-3 cloves garlic
  • 3 tbsp olive oil
  • 1 cup light ricotta cheese
  • 1 egg
  • 1/4- 1/2 cup fresh basil, chopped or torn
  • 1/4 cup grated Parmesan
  • Parmesan for serving
  • salt and pepper

lasagna finished

Directions:

You will probably want to slice your eggplant first, as it’s the only pseudo labor-intensive part of this recipe. Cut the top off of your eggplants so you can stand them sturdily on one end. With a large knife, slice them in 1/4 inch slices from top to bottom (you may instead slice the eggplants horizontally, if you like; comme ci, comme ça). Brush both sides of the slices with 2 tbsp olive oil and sprinkle with salt and pepper, then arrange on two baking sheets.

sliced and ready to broil

sliced and ready to broil

Okay, now preheat your broiler. While it heats up, puree garlic, 1 tbsp olive oil, and 1/4 tsp each salt and pepper in a blender. Sauce: done! Fabulous! Slide the first baking sheet of eggplant into the oven and broil your rustic slices for 3-4 minutes per side, flipping once. Repeat with the second batch.

sauce in blender

While the eggplant cooks, grab a small bowl and combine the ricotta, egg, basil, and another 1/4 each salt and pepper. Mix throughly to combine. When all eggplant slices have been broiled, lower the oven heat to 400. In the bottom of a deep 8″ baking dish or a 9×13″ dish (whichever will hold the length of your eggplant slices), spread half of the tomato sauce. Layer one-third of the eggplant slices over the sauce and top with half of the ricotta mixture. Repeat the eggplant layer and the ricotta layer, using the remaining ricotta.  Top with the last of the eggplant, the sauce, the Parmesan, and a few decorative basil leaves if you’re feeling fancy.

eggplant heading for oven

Bake for 15-20 minutes, uncovered,  until the lasagna bubbles and the top is slightly browned. Take an artful picture of your cat in the meantime.

artful cat

rawr

Remove lasagna from the oven and let cool ten minutes before serving. The mixed greens with oil and vinegar really were a perfect accompaniment. We had a few chicken breasts left over from the night before, so we had those, too. The greens alone would have been fine. This meal makes a very pretty and light lunch or dinner, all while being easy on the wallet and waistline. Enjoy!

eggplant dinner


Michael Pollan, Saturated Fat, and Braised Fennel (veg, gf)

Fennel. So lovely, so fragrant, so exotic-looking when wedged between carrots and celery in the produce section, like a ballerina on a bus. It stumps check-out clerks and home cooks, causing both to miss out on its nutritional benefits if they do not know what in the heck to do with a bulb once they’ve brought it home.

feathery fronds

feathery fronds

Fennel packs vitamin C, fiber and potassium in each serving, making it a nutritional powerhouse and especially beneficial to runners and athletes recovering from hard workouts. Low in calories and incredibly flavorful, it’s a stellar addition to any home menu. All while earning you “cook unafraid of unusual vegetable” points (score!).

fennel braised

My favorite way to prepare fennel is the simple braise outlined below; another favorite is tossing it into this A!G Provencal Fish Stew. This braise pairs well with chicken, fish, or pork, or with loads of other veggies- I’ve served it alongside roasted carrots, onions, and brussels sprouts as a hearty all-veggie dinner. Hope you enjoy! And how else have you prepared fennel?

BRAISED FENNEL

Adapted from McDaniel Nutriton

Ingredients:

  • 3 large fennel bulbs, trimmed and sliced (you can use the stalks as well)
  • 1 cup broth or 1 cup water and 1 tsp vegetable base
  • 4 tbsp butter- this sounds like a lot but bear with me
  • 3 cloves garlic, minced, or 3 tsp crushed garlic
  • 2 tbsp fennel seeds

Directions:

After prepping the fennel, this recipe is a one-step wonder. You’ll toss all of the ingredients into a saucepan and cook in just a moment. Clean your fennel bulbs and cut off a slice of the thick root end. Lob off the fronds and reserve for another use and cop the stems and root into 1-inch slices. I find it easiest to quarter the bulbs and cut from that point.

fennel ingreds

Now before you toss everything into your pan, let’s talk butter. Recent studies have shown that “bad” saturated dietary fat, if it comes from high-quality organic sources (think organic butter from grass-fed cows, grass-fed or pasture raised beef, raw cheeses, strained organic yogurt, whole organic milk, eggs form pasture-raised chickens, etc.), may not be that bad after all. Scientists and the food-minded argue that it’s the highly-processed trans fats and chemically altered saturated fats and preservatives that are killing us. A 2010 study by the American Society for Nutrition concludes that:

“A meta-analysis of prospective epidemiologic studies showed that there is no significant evidence for concluding that dietary saturated fat is associated with an increased risk of CHD (coronary heart disease) or CVD (cardiovascular disease).”

WHOA. In a recent conversation about the saturated fat vs. high-quality full-fat food debate, a friend pointed out that the food our healthier, more active, longer-living grandparents ate was full fat, was often organic before that was a “thing,” was fresh, and was more satiating due to its high fat (and fiber) content. Hmm. Very true. Our grandparents also ate more vegetables and whole grains than we do- no slabs of meat at each meal and no bags of Doritos and partially hydrogenated cheese dip. And they ate smaller portions. The argument for full-fat foods does not, by any means suggest that eating plates of hand-cured, gourmet, farm-raised bacon with six eggs and toast slathered in butter is a good for you- everything in moderation, my friend. Journalist and food activist Michael Pollan, with whom I’ve recently become obsessed, says it best:

“Eat food. Not too much. Mostly plants.”

So to celebrate that mantra and to test the new theory, which makes perfect sense in my mind, let’s eat veggies and use butter today! Back to the recipe. Add all ingredients to a deep saucepan and bring to a boil. Reduce heat, cover, and simmer for 10 minutes. Uncover and continue cooking over medium for another few minutes, until most of the cooking liquid has evaporated; don’t allow the fennel to get mushy. There you have it! Serve. What are your thoughts on the saturated fat debate? I’d love to hear your comments below!

simmering fennel


Quickie: Easy Blender Hummus (v, gf)

Sometimes you just need an easy snack. Something nutritious and fast that you can have around for a while or feed a crowd with. My answer? Hummus. Friends coming over on short notice and you don’t know what to serve? A hummus and veggie tray. Have kids? Want to make lunches with minimal ingredients so you’re not cooking all week? Consider hummus sandwiches, pitas, or snack packs. Need a healthy afternoon pick-me-up at work? Hummus and chips. You see where I’m going with this. I mean, really- throw all ingredients into a blender. Blend. Serve. Who doesn’t love a recipe like that?

image

Here’s Buzzfeed’s take on how to eat hummus all day long. And here’s Bon Appétit’s list of 10 things to do with hummus.

EASY BLENDER HUMMUS

Adapted from my beloved Mark Bittman

Ingredients:

  • 2 cans reduced-sodium garbanzo beans, drained with liquid reserved
  • 1 cup tahini
  • 1/2 cup olive oil
  • juice of 2 lemons
  • 1 tbsp cumin
  • 1 tbsp paprika or smoked paprika
  • 2 tsp crushed garlic
  • roasted garlic cloves, optional
  • kosher salt, to taste
  • freshly ground black pepper, to taste

Directions:

Place all ingredients in a large blender or food processor bowl; you can halve this recipe easily. Blend, pouring in the reserved liquid from the garbanzos until the hummus is as smooth as you’d like (you may need to scrape the bowl). Taste, adjust seasonings, and serve, refrigerating leftovers. Enjoy!!

a cross-section of hummus fixins

a cross-section of hummus fixins


Stand Mixer Buttermilk Biscuits, or Ode to the KitchenAid, or Today, I Am A Woman

For Christmas, my thoughtful and generous mother-in-law gifted us the loveliest KitchenAid stand mixer in a retro mint green hue. It is a truly beautiful piece of equipment and an object of design perfection. Opening our new mixer felt like a rite of passage into True Womanhood. Just owning the thing makes me feel like a domestic goddess and I’m pretty sure it’s made me a better wife. Ha!

image

In my slightly melodramatic, tradition-loving eyes, when one comes to own a KitchenAid, one is inducted into a time-honored order of serious home cooks and bakers. I really feel the blessings of a million lovingly-made birthday cakes and doting grandmothers enveloping my kitchen, and I love them all.

I'm now one degree of separation away from Julia Child. here's her mixer at the National Museum of American History

I’m now one degree of separation away from Julia Child, right? here’s her mixer at the National Museum of American History.

It’s no small surprise that after gazing longingly at the mixer for a few weeks during an especially busy holiday season, as it radiated the mint green glow of graceful experience from its shelf, I launched myself into a series of attempts to make Womanly Things with it. Yesterday’s crack at gender inequality yielded some of the softest, most buttery and delicious biscuits I’ve ever tasted… and I’d made them. WHOA. My gain is your gain! Behold….. buttermilk biscuits!

butter me up

STAND MIXER BUTTERMILK BISCUITS

Adapted from Broma Bakery

Ingredients:

  • 2 cups all-purpose flour, plus more for dusting
  • 2 tsp sugar
  • 1 tbsp baking powder
  • 1 tsp kosher salt
  • 1 stick butter, chilled and cut into squares
  • 3/4 cup buttermilk

Directions:

Set up your stand mixer. Dust off the top. Pat it affectionately. Pre-heat your oven to 425 and grease a baking sheet. Add the flour, sugar, salt, and baking powder to the bowl and mix at medium speed (I used setting 4) with the whisk attachment. With the whisk attachment still in use and the motor running, add butter squares and allow to mix until the crumbs resemble cornmeal. This will take 3-5 minutes, so be patient- it’s still faster than cutting in butter with a pastry cutter and will be much more even.

Butter should mix in like this

Butter should mix in like this

Switch out the whisk for the dough hook attachment and turn speed back up to medium. In three additions, pour in the buttermilk, allowing the dough to absorb it between each pour. Let the dough hook mix it all up until the dough hangs on the hook in a ball, about another minute. Don’t over mix.

dough on hook

dough on hook

Lightly flour your hands, a rolling pin, and your rolling surface and plop the dough down. I really dislike the thought of rolling food out on a counter, so I use a flat, heavy, oversized cutting board for working and rolling dough. So there’s that. Pat the dough into a rough ball and begin rolling out in all directions, keeping the rolled surface level. I rolled my biscuits out to a 1/2 inch, but feel free to roll to a 3/4 inch or 1 inch height for taller biscuits, you showy thing, you. Cut out using a biscuit cutter or, as suggested in the original recipe, the top of a cocktail shaker! That worked perfectly for me- who knew?!

two uses- fabulous!

two uses- fabulous!

image

Cut all of the biscuits you can, and re-roll the dough, re-cutting as needed. This recipe yielded eleven biscuits for me, all of which were eaten same-day. Place the biscuits on your prepped baking sheet or, alternatively, in a cake pan or cast iron skillet for fluffy, pull-apart edges. Bake for 15 minutes, turning the baking sheet once. Voila! You’ve rocketed into the floury stratosphere of People Who Can Make Biscuits! Next time, I’m adding more sugar and using for strawberry-rhubarb shortcakes… stay tuned!

who had the best helpers in the world?! scissors, spoon, and all.

who had the best helpers in the world?! scissors, spoon, and all.